Exceptionless Client for Rust — Capture Errors, Logs, and Feature Usage Events
I recently rewrote HTTP File Generator—a tool I originally built in .NET—from .NET to Rust for performance reasons. On older hardware, the Rust CLI runs about 60x faster than the legacy .NET tool. But with the rewrite came a problem: I had been using Exceptionless in the .NET version to capture errors, logs, and feature usage events. Once the app was in Rust, I had no way to keep sending telemetry to my Exceptionless instance.
I searched the Rust ecosystem for an Exceptionless client. There was nothing. So I built one.
exceptionless-rs is now available on crates.io with documentation at docs.rs/exceptionless. It’s a clean, async-first client that lets .NET developers who are moving to Rust continue using Exceptionless with a familiar fluent API.
Why Stick with Exceptionless?
If you’re a .NET developer who has used Exceptionless, you know the value: a single dashboard for errors, logs, and feature analytics. When I rewrote HTTP File Generator in Rust, I didn’t want to manage a second telemetry stack. I wanted the same Exceptionless project, the same dashboards, the same alerting.
Exceptionless is open-source and can be self-hosted or used via their cloud service at exceptionless.io. Events are sent to collector.exceptionless.io by default, or to your own server if you’re self-hosting. The Rust client supports both.
Getting Started
Adding the client to your project is straightforward:
[dependencies]
exceptionless = "0.1"
For local development and testing, enable the opt-out feature. This keeps telemetry calls wired in but makes them no-op successes—no configuration changes needed between dev and production:
[dependencies]
exceptionless = { version = "0.1", features = ["opt-out"] }
Create a client with your API key:
use exceptionless::ExceptionlessClient;

#[tokio::main]
async fn main() -> Result<(), Box<dyn std::error::Error>> {
    let client = ExceptionlessClient::with_api_key("YOUR_API_KEY");

    // Ready to report events
    Ok(())
}
That’s it. The built-in HTTP transport uses reqwest, so all submission is non-blocking.
Capturing Errors
In the .NET Exceptionless client, you capture an exception with ExceptionlessClient.Default.SubmitException(ex). In Rust, the equivalent uses a builder pattern that chains methods before calling send().await:
use core::num::ParseIntError;
use exceptionless::ExceptionlessClient;

#[tokio::main]
async fn main() -> Result<(), Box<dyn std::error::Error>> {
    let client = ExceptionlessClient::with_api_key("YOUR_API_KEY_HERE");

    let result = parse();

    match result {
        Err(e) => {
            client
                .capture_error(&e)
                .tag("parsing")
                .source("user_input")
                .version("0.1.0")
                .send()
                .await?;
            println!("Error reported to Exceptionless");
        }
        Ok(num) => {
            println!("Parsed number: {}", num);
        }
    }

    Ok(())
}

fn parse() -> Result<i32, ParseIntError> {
    text.parse()
}
The client automatically captures the error message and type from Rust’s std::error::Error trait. Use the builder methods to add context:
.tag(name)— label the event (e.g., “auth”, “database”, “payment”).source(module)— identify where the error originated.version(v)— track which version encountered the error.user_identity(id)— associate the error with a user.data(key, value)— attach arbitrary metadata
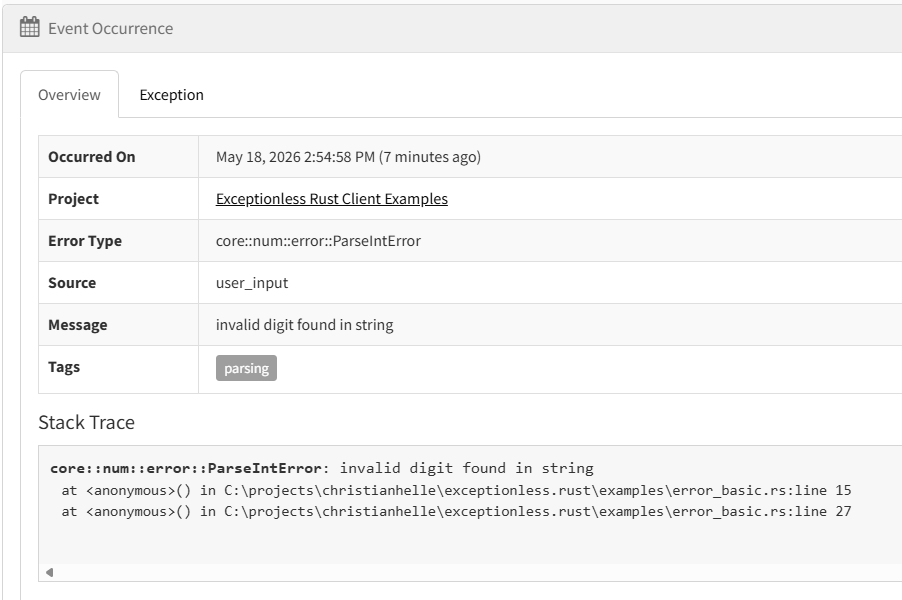
The error surfaces in your Exceptionless dashboard with the full stack trace and metadata:
Sending Structured Logs
Logging with Exceptionless works the same way in Rust as in .NET. In .NET you’d call SubmitLog("message"). In Rust:
use exceptionless::ExceptionlessClient;

#[tokio::main]
async fn main() -> Result<(), Box<dyn std::error::Error>> {
    let client = ExceptionlessClient::with_api_key("YOUR_API_KEY");

    client.log("User logged in")
        .level("info")
        .tag("authentication")
        .user_identity("user@example.com")
        .send()
        .await?;

    Ok(())
}
The log level is a string—currently "trace", "debug", "info", "warn", "error", and "fatal" are supported. The client trims surrounding whitespace and omits blank values. It does not validate against a fixed enum yet.
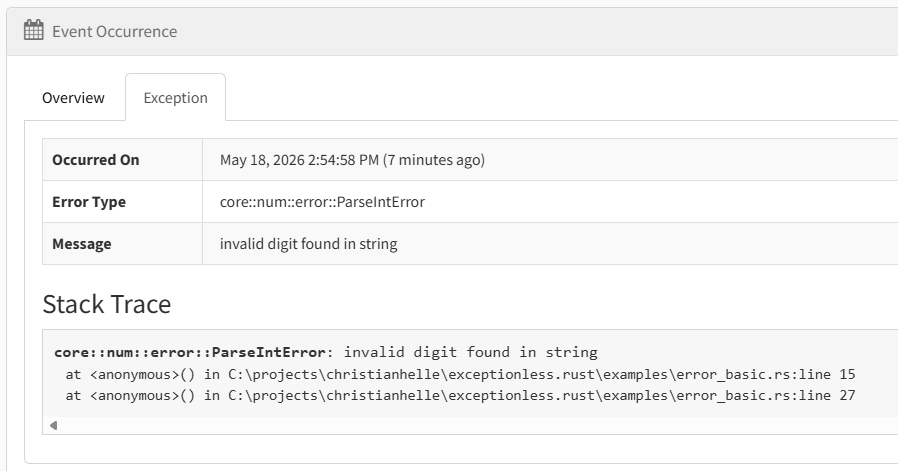
Structured logs appear in the Exceptionless Logs view alongside error events, making it easy to correlate log entries with the exceptions they preceded:
Tracking Feature Usage
Feature tracking lets you record which features your users interact with. This is invaluable for understanding adoption and prioritizing development work.
In .NET, you’d call SubmitFeatureUsage("feature_name"). In Rust, the API is similarly simple:
use exceptionless::ExceptionlessClient;

#[tokio::main]
async fn main() -> Result<(), Box<dyn std::error::Error>> {
    let client = ExceptionlessClient::with_api_key("YOUR_API_KEY");

    client.feature("export_to_pdf")
        .tag("premium_feature")
        .user_identity("user@example.com")
        .send()
        .await?;

    Ok(())
}
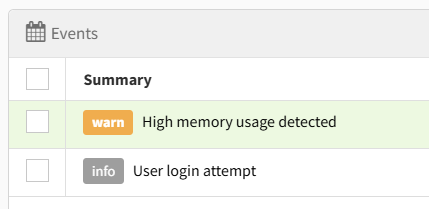
Feature events show up in the Feature Usage dashboard, giving you visibility into which features matter most to your users:
![]()
Configuration
Custom Server
If you’re self-hosting Exceptionless, point the client to your server:
use exceptionless::ExceptionlessClient;
use exceptionless::config::ClientConfig;
use exceptionless::transport::http::HttpTransport;

#[tokio::main]
async fn main() -> Result<(), Box<dyn std::error::Error>> {
    let config = ClientConfig::new("YOUR_API_KEY")
        .with_server_url("https://your-exceptionless-server.com");

    let client = ExceptionlessClient::new(config, HttpTransport::default());

    client.log("Server configured").send().await?;

    Ok(())
}
The HttpTransport and ExceptionlessClient::with_api_key() constructor are available in every build. When you enable the opt-out Cargo feature, all send() and submit_batch() paths return success without sending anything.
Disabling the Client
For local development or testing, you can disable event submission:
let config = ClientConfig::new("YOUR_API_KEY")
    .with_enabled(false);
When disabled, send() and submit_batch() return a configuration error before any request is sent—unless the opt-out Cargo feature is enabled, in which case they silently succeed.
Compile-Time Opt-Out
The opt-out Cargo feature is particularly useful for .NET developers who are used to toggling IExceptionlessConfiguration.Enabled. With opt-out enabled, telemetry submission becomes a no-op success at compile time. Calls like .send().await? still succeed, but no request is serialized or submitted—no runtime configuration needed.
Compared to the .NET Exceptionless Client
If you’ve used Exceptionless for .NET, you’ll recognize the patterns. The Rust client mirrors the core event submission API, but it’s important to note that this is a first release focused on core functionality. The .NET client is significantly more feature-rich.
Here’s how they compare:
| Feature | .NET Client | Rust Client |
|---|---|---|
| Error reporting | ✅ | ✅ |
| Log events | ✅ | ✅ |
| Feature tracking | ✅ | ✅ |
| Custom metadata | ✅ | ✅ |
| Async submission | ✅ (Task) |
✅ (async/await) |
| Bearer authentication | ✅ | ✅ |
| Event queuing & batch retry | ✅ | ❌ |
| Session tracking | ✅ | ❌ |
| Plugin system | ✅ | ❌ |
| Server settings sync | ✅ | ❌ |
| Log level filtering | ✅ | ❌ |
| Automatic environment data | ✅ | ❌ |
The .NET client has a rich architecture that the Rust client doesn’t yet have:
- Event Queue: The .NET client uses an
IEventQueuewith built-in batch submission and retry logic. Events are queued to disk and sent in batches, ensuring nothing is lost even if the network fails. The Rust client sends events immediately. - Plugin Pipeline:
EventPluginManagerruns plugins that automatically enrich events with environment data, user info, stack traces, and more. The Rust client captures the error message and type but doesn’t auto-enrich events with system information. - Settings Management: The .NET client periodically syncs configuration from the Exceptionless server (like ignoring specific errors, setting log levels, defining custom properties). The Rust client has no server-side settings support.
- Session Tracking: The .NET client tracks sessions automatically, grouping events by user session. The Rust client has no session tracking yet.
- Configuration: The .NET client supports
ExceptionlessConfigurationwith extensive options for customization. The Rust client has a simplerClientConfigwith the basics.
The Rust client is designed to be a solid foundation. The missing features are on the roadmap, and the API is designed to accommodate them as they’re added.
Real-World Usage: HTTP File Generator
The exceptionless-rs client powers the telemetry in HTTP File Generator, which was originally written in .NET and later rewritten in Rust. The integration demonstrates how to use the client in a real application with a sink-agnostic design.
HTTP File Generator uses a TelemetrySinkCollection enum to abstract over different telemetry backends:
pub enum TelemetrySinkCollection {
    Exceptionless(ExceptionlessTelemetrySink),
    Memory(MemoryTelemetrySink),
    Noop(NoopTelemetrySink),
}
The TelemetryRecorder is no longer generic, but instead holds a TelemetrySinkCollection, allowing different backends for different environments:
pub struct TelemetryRecorder {
    context: Option<TelemetryContext>,
    sink: TelemetrySinkCollection,
}
In production, the Exceptionless variant is used to emit events to Exceptionless. During development, the Noop variant ensures no telemetry is sent, while in tests, the Memory variant captures events for verification.
The recorder captures feature usage events when commands complete successfully:
pub fn record_feature_usage(&mut self, args: &CliArgs) {
    let Some(context) = &self.context else {
        return;
    };

    for feature_name in feature_usage_names(args) {
        self.sink.emit(TelemetryEvent::FeatureUsage(FeatureUsageEvent {
            feature_name,
            support_key: context.support_key.clone(),
            anonymous_identity: context.anonymous_identity.clone(),
        }));
    }
}
And error events when commands fail:
pub fn record_error(&mut self, args: &CliArgs, error_type: &str, message: &str) {
    let Some(context) = &self.context else {
        return;
    };

    let settings = redacted_settings(args);
    let settings_json = serde_json::Value::Object(settings.clone()).to_string();

    self.sink.emit(TelemetryEvent::Error(ErrorEvent {
        error_type: error_type.to_string(),
        message: message.to_string(),
        support_key: context.support_key.clone(),
        anonymous_identity: context.anonymous_identity.clone(),
        command_line: context.command_line.clone(),
        settings_json,
        settings,
    }));
}
Privacy is important. The support key is derived from an anonymous identity, authorization headers are redacted as [REDACTED], and no personal machine details are included. The user can opt out entirely with --no-logging, which disables the context and prevents any telemetry from being recorded.
When errors do get reported to Exceptionless, they include the error type, message, and redacted settings—enough context to diagnose issues without exposing sensitive data:
What’s Next
The current release (v0.1) covers the core event types that matter most for getting started. Here’s what’s on the roadmap:
- Session tracking — Group events by user session for better analytics
- Event queuing and batch retry — Queue events to disk and send in batches with automatic retry on failure
- Plugin system — Allow users to register plugins that enrich events with custom data
- Log level filtering — Configure which log levels are sent to the server
- Automatic environment data — Auto-capture OS, architecture, and other environment details
I’m particularly excited about session tracking and event queuing, as these are the features I miss most when using the Rust client compared to the .NET version.
Conclusion
If you’re a .NET developer who has used Exceptionless and is looking to add Rust to your toolkit, exceptionless-rs lets you continue using the same telemetry infrastructure you already know. The fluent builder API will feel familiar, and the async-first design fits naturally into the Rust ecosystem.
The client is still young, and the feature set doesn’t yet match the .NET client’s richness. But the foundation is solid, the API is designed to accommodate future features, and the codebase is open for contributions.
Get started today:
- Source code: github.com/christianhelle/exceptionless-rs
- Package: crates.io/crates/exceptionless
- Documentation: docs.rs/exceptionless